I'm Eli, an engineer and mushroom enthusiast. Here is an accounting of some of my recent projects, trials, and tribulations, and what was learned therefrom.


|
This is a follow-up to my most recent post detailing the construction of a laminar flow hood. Check out that post for the background info and rationale for this project. In this post, I discuss the construction of the actual hood attachment - which will double up as a UV Sterilization cabinet - as well as a wooden stand on which the apparatus will sit. 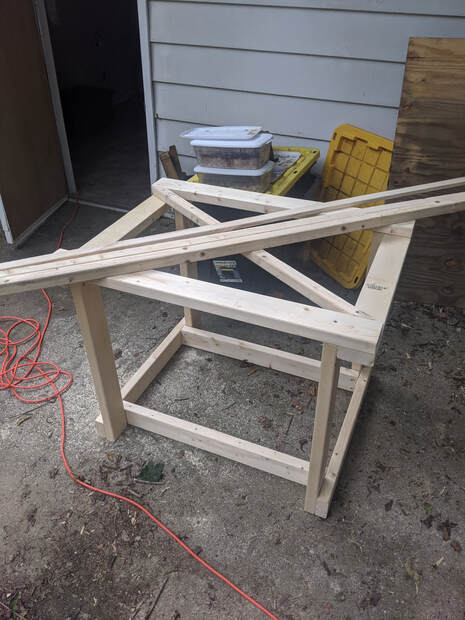 The stand about 75% completed. Diagonal reinforcement 2x2s still to be added as well as casters to the bottom. My goals for the stand were to free up valuable real estate on the table it had been sitting on, and also raise it higher by about 10 inches for ergonomic reasons. The hood attachment is essentially an 18" long tunnel that I don't want to have to stoop down to see into. The stand will also allow me to more easily move the device around, as it's both large and unwieldy for one person to move, and heavy. The 1/2" plywood out of which I'm building the hood attachment of course adds even more weight. I can also add some extra storage space to my lab by using the lower portion of the stand as shelving! The best equipment is truly multi-use equipment. I added a 1x2 member to the frame at the base, with the narrow edge facing upwards, to add some rigidity to the center of the plywood sheet. I had to disassemble the stand as seen in the below photo because it wouldn't fit through the door to the lab in one piece! The house this is in is rather old and idiosyncratic so that particular door is a mere 28" wide as opposed to a more typical 36". The narrowest part of the stand was 28.5".... 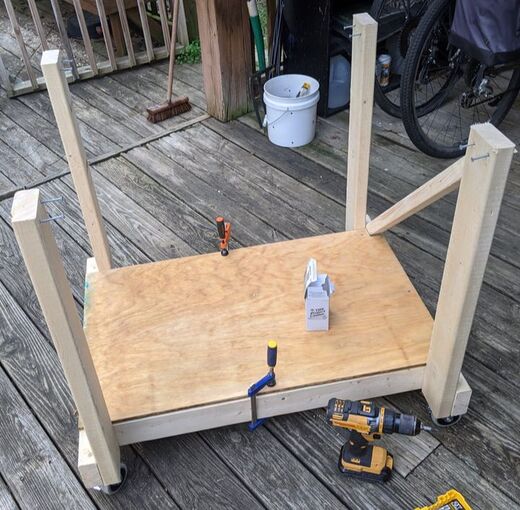 The stand with the top part disassembled, casters added, and a sheet of plywood about to be screwed to the base. 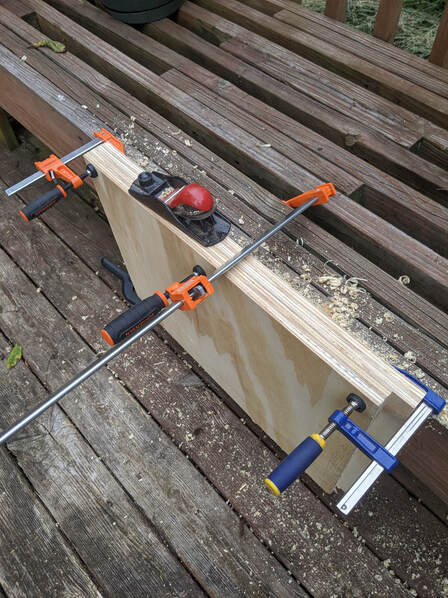 The four plywood panels to comprise the hood attachment clamped together with some bar clamps to facilitate some planing. The hand-plane is visible ontop of the stack of panels. I did my best to accurately cut out rectangular panels of 1/2" plywood using a standard circular saw. However, no matter how hard I concentrate when cutting plywood with the circular, some small bit of variation (wavy cuts) creeps in. Enough to be annoying but still "good enough". However I wanted a tighter, more precise fit for this project. I came up with what I think is a rather innovative way to ensure the edges of the panels are flush to one another. I clamped all four together very tightly and then ran a hand plane along the edges until everything was flat and smooth. This eliminates the slight waviness of the panel edges quite nicely. Ideally I would be using a table saw or similarly more advanced tools. But, the fun part of projects like this is being creative with the tools and materials available. 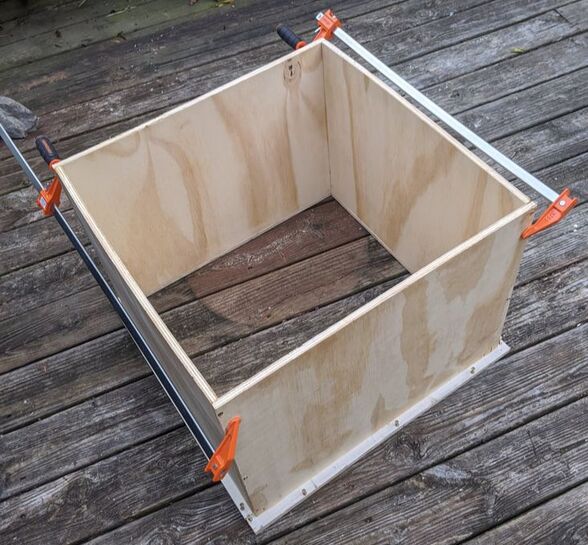 The four panels being fixed to one another. The long bar clamps were absolutely essential for this. The strips of plywood at the bottom are what attaches to the face of the HEPA filter. I fixed the panels together by applying wood glue to the edges, clamping them, pre-drilling holes, and then screwing in 1-1/4" long wood screws. If I didn't pre-drill holes the plywood that's taking the screw edge-on would split open. The wood glue will ensure an airtight fit and will take some pressure off the screws and would make a delamination failure less likely (yes, this thing is overbuilt - "skookum as frig" as my favorite Canadian 200 lb shop gorilla YouTuber would put it). 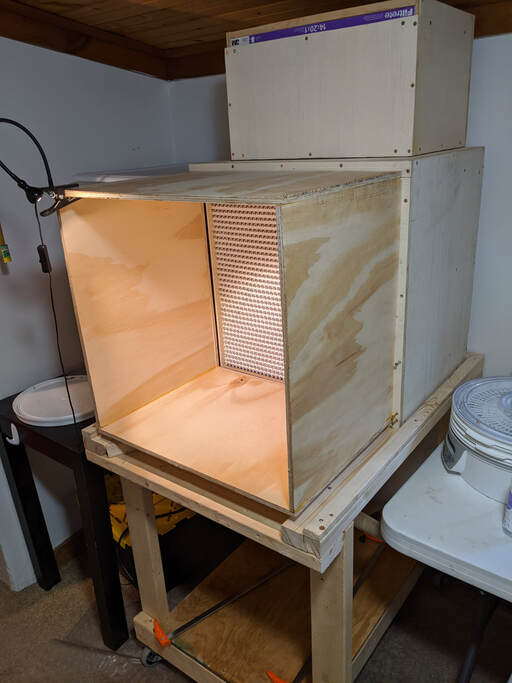 The hood as a work-in-progress. Did a test fit to the HEPA filter box and it did alright. The warped panels are difficult to notice in the photo, but the righthand one is bent outward slightly. And it annoys me. 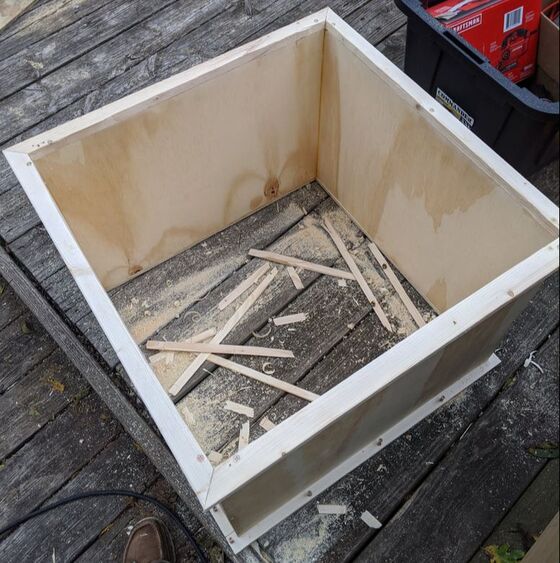 Reinforcing frame of 1x2 strips screwed to the edges of the plywood panels. I decided it needed some reinforcement on the front end so I took some 8' lengths of 1"x2" furrowing strips, cut them into 25" lengths (long edge), with 45 degree ends, and screwed them to the edge of the plywood box that would face towards the user. This is where the door is going to go. The main reason for this was because some of the plywood is slightly warped and bowed outwards. Would have worked fine for the purposes of this project but would also have looked kind of ugly and half-assed, I figured I could do better. I put the strips on the plywood in such a way as to maximize their stiffness in the direction that the plywood wanted to bend. The added stiffness also gives it some bonus rigidity that should be helpful where the door is concerned. The debris and shavings are from sawing, planing and filing the inward edge of the strips so they would be flush with the inward face of the plywood. There was an overhang approaching 3/8" in some places, due to some slight imprecision when cutting the strips (length slightly low, oh well, remedy found). It's important to me that the interior surfaces of the hood be as smooth and flush with themselves as possible. This is because I want smooth laminar airflow to minimize the chance of contaminants being dragged in from outside the "clean air zone". Unfortunately I neglected to take photos of the next stages of construction, in which I built a door. Made a frame out of lengths of miter-cut 1x2 strips identical to the ones used for the frontal hood reinforcement and screwed them down to a square panel of the same 1/2" plywood. I also painted the interior with some Ultra-white semi-gloss exterior paint+primer. This paint is billed for mildew resistance. My goals for painting were to have a smoother interior surface that would hinder bacterial or fungal growth, and also make it look nice. I feel that it has succeeded on both counts. 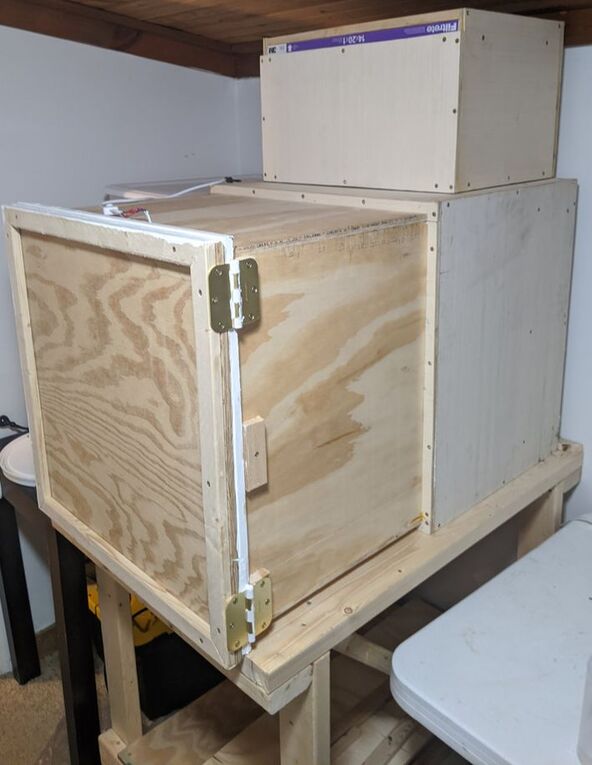 The finished flow hood/sterilization cabinet. The white wire coming out of the top is for the UV lamp. 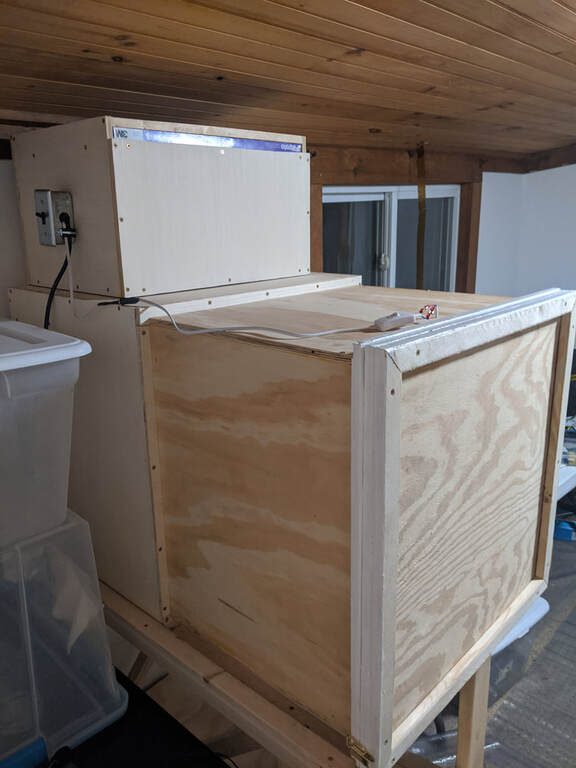 Thanks to warped plywood the door wouldn't close completely if not for the pull latch seen on the bottom left. Getting the hinges aligned so it would close properly took some adjustments and shimming. And as mentioned the annoyances of the warped plywood prevents the door from closing all the way without a bit of extra pressure (a small pull latch is more than sufficient for this). The door, when opened, also is somewhat in the way. I've found I often am wanting to grab something from the table, off to the right, and have to step around the door. Could remedy this by having the door drop down rather than swing to the right. 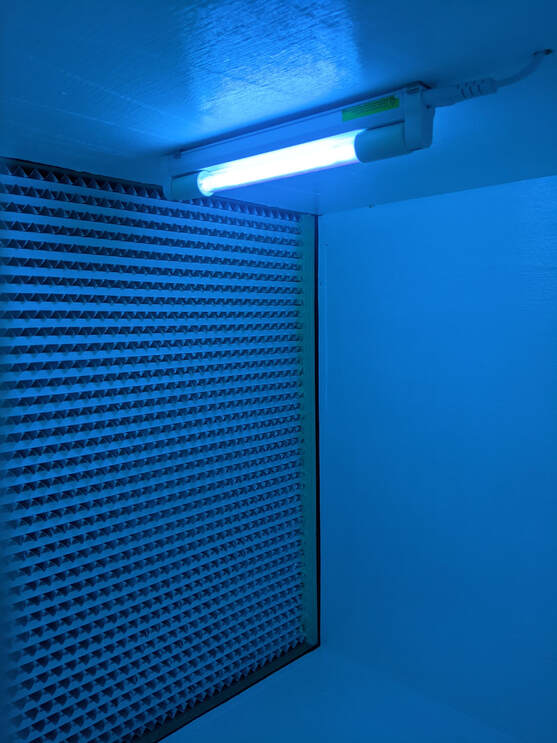 The UV lamp, doing its thing. 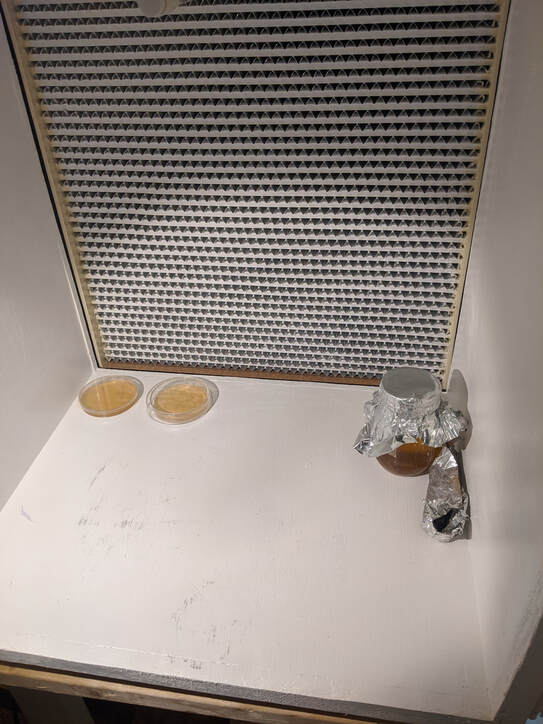 Some petri dishes, a jar of liquid culture broth, and some tools staged in the cabinet. I ordered a small 8W UV-C lamp from ebay for about $9. Quite easy to wire up, runs off 120VAC so I simply tapped it into the switchbox that powers the blower. The cord that came with the lamp has its own integrated switch.
The primary purpose of the flow hood is to enable reliable production of grain spawn and clean cultures on agar. The UV capabilities will be great for sterilizing the walls themselves, so if a tool or substrate container inadvertently comes into contact with the floor or walls, contamination risk is minimized. I've also been using it to sterilize the interiors of my polycarbonate petri dishes when reusing them - they can't be autoclave-sterilized as glass dishes can as they'd melt. Since I'm using a jiggle-weight pressure canner as my autoclave, outside air enters the canner as it cools. This could potentially introduce contaminants. However, with the canner placed inside the hood and the blower turned on, I can be incredibly confident that any air entering the hallowed sterile sanctum within be equally sterile, having been scrubbed to HEPA standards. This setup is great for agar work. The key is to keep unsterile objects (such as the user's hands) downstream of critical surfaces, such as an open grain jar or an uncovered petri dish. A final note of caution, concerning UV safety: Germicidal UV is hazardous for human health. Direct exposure to skin and particularly eyes should be avoided. That is really the only reason for the door in the first place. The photograph of the interior of the cabinet, with the UV lamp on, was taken with the door cracked open half an inch and my phone's camera peeked through. Going forward, changes I would probably make:
0 Comments
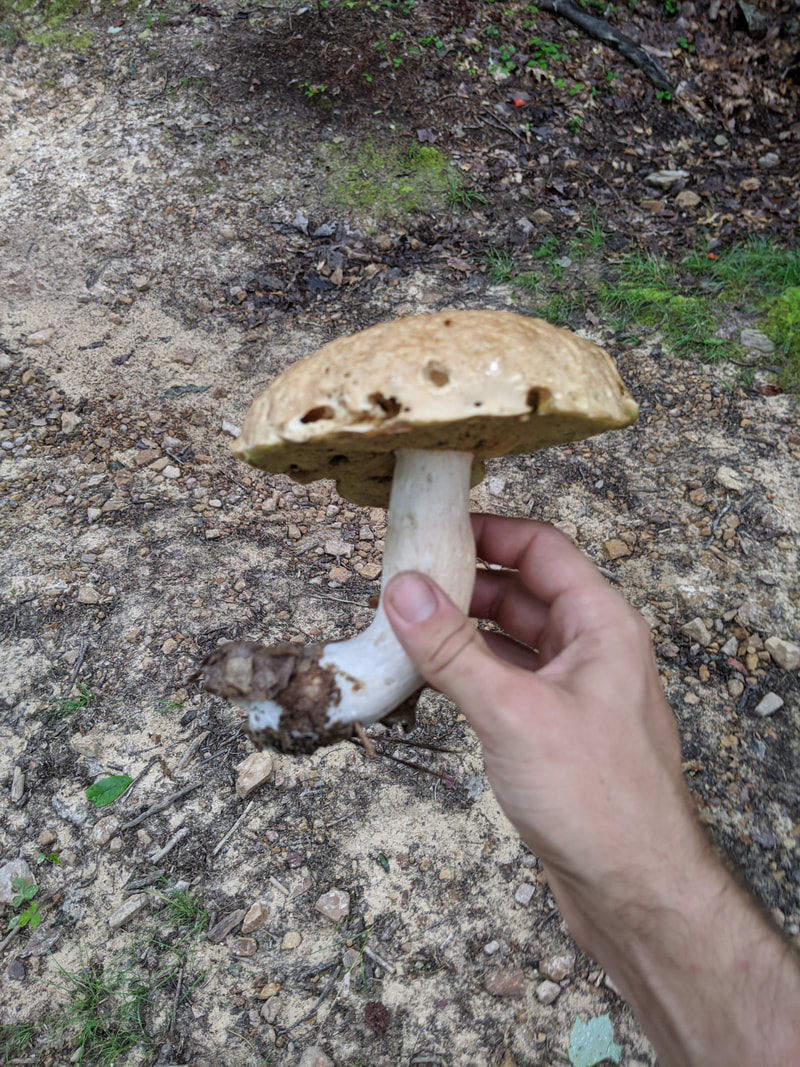
 My motivation for this project! A contaminated bag of mushroom grain spawn. Trichoderma mold and likely bacterial bloom. As part of my ambitions for cultivating mushrooms, I needed a far more reliable method of doing sterile work than the old still air box. For those not in the know, a still air box is.... exactly what it sounds like. It's a cheap way to do sterile work (such as transferring cultures to agar plates, grain-to-grain transfers, etc). Most people use clear plastic totes with arm holes cut out. The idea is that an isolated environment in the box with minimally disturbed air will prevent wild spores and microbes from contaminating sterile workpieces, based on the idea that contaminants will only ever fall downwards from the user's hands, or unsterilized equipment. Therefore the basic rule for operating within such a box is to keep your hands and non-sterile tools from being directly above your sterile workpiece (such as an agar plate, open jar of pressure-cooked grain, or whatever else). There's a lot that could go wrong with such a system and few ways to know exactly how your sterile environment was compromised. Furthermore since the tote I had been using as a still air box was only about 16 inches tall it was a huge pain to try and do sterile grain transfers when working with an 18" tall autoclave bag. The main point is I'd been getting increasingly inconsistent results and rising contamination rates. The contamination usually takes the form of green mold on mushroom grain spawn, or bacterial blotches/blooms on agar plates and in liquid culture jars. Since I'm trying to up my game and get more reliable results I decided to build a laminar flow hood, following pretty closely this guide: blog.freshcapmushrooms.com/learn/keeping-it-clean-how-to-design-and-build-a-laminar-flow-hood/ The idea behind a laminar flow hood is, it filters out all airborne contaminants such as mold spores and bacteria so you have a stream of guaranteed sterile air blowing over your work space. A proper clean room or microbiology lab would have positive pressure HEPA filtration in the entire room in addition to such benchtop equipment, but since I'm doing this in a spare bedroom in my house the flow hood is a great place to start. The guide I linked from the FreshCap blog explains the design principles and construction process pretty well so I won't go into much detail here. I decided to go for a 24"x24" HEPA filter because I found one for a good price, and it could accommodate an 18" tall autoclave bag (industry standard for sterilized media in the mushroom growing world) with room to spare. Note that while the FreshCap guide recommends a 99.99% efficient HEPA filter (for 0.3 µm particles), I went with a 99.97%. The slightly less efficient filters are a bit more common and cheaper and I figured 99.97% would be good enough for my purposes. Mold spores are almost all larger than 1.0 µm. I went with a Dayton model 1TDR7 blower because it was the cheapest blower rated for over 400 CFM at a pressure drop of 0.3" water column. That pressure drop is what I estimated as the resistance caused by both the 24"x24" HEPA filter and the prefilter at 400 CFM. My minimum airflow requirement is 380 CFM as that's the volume flow rate equivalent to 100 ft/minute of airspeed coming out of the main HEPA filter. 100 ft/minute is the guideline for good laminar flow in this application, sourced from the guide linked above. I differed from the guide by using 1/2" plywood instead of 3/4", with weight savings in mind. The cost difference really isn't that much, a 4'x8' sheet of 1/2" sanded plywood is only about $10 cheaper than the same of 3/4". For comparison, the blower and HEPA filter together came in at just over $300. 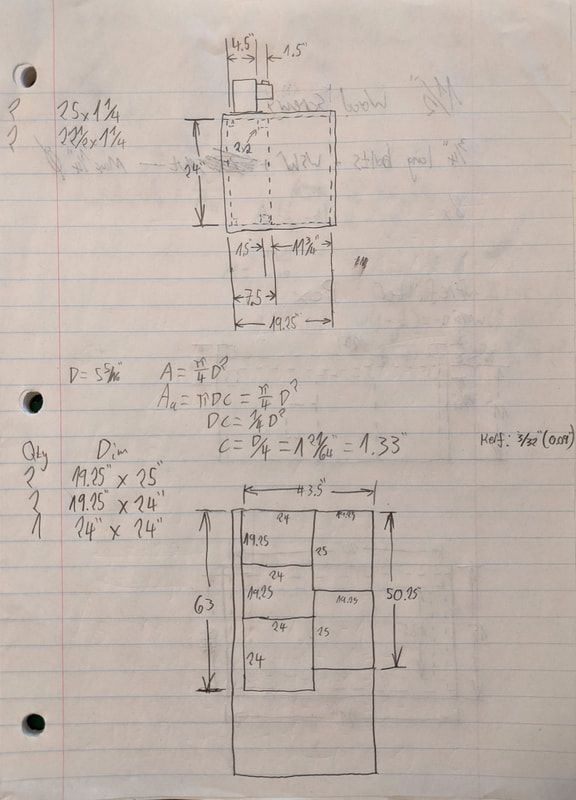 The primary drawing I made to determine dimensions of the cuts I'd make. On top is a side view. Bottom is a plan of how to cut out the 4'x8' plywood sheet for the main box's panels. The equation inbetween was to work out how far the blower's inlet needed to be from the nearest wall for maximum airflow. The drawing on the top half of the sheet above shows a side view of the primary filter housing. You can see that the primary (HEPA) filter is quite deep, 11.75" to be precise. I sized the plenum behind it (where the blower exhausts) so that the internal dimensions of the blower's exhaust duct would not be obstructed. The square of dashed lines in the upper and lower right of the plenum (with the "2x2" callout) indicates a piece of wood there to both provide some extra rigidity to the structure and also stop the HEPA filter from sliding into the plenum area. I ended up making this out of a section of 2"x3" whitewood stud. Initially I fretted about how much space there needed to be between the blower's inlet and the rear panel of the prefilter plenum in order to maintain maximum blower performance (I figured the minimum clearance would be 1.33"). Then I realized I could just rotate it 90 degrees and make it a non-issue. 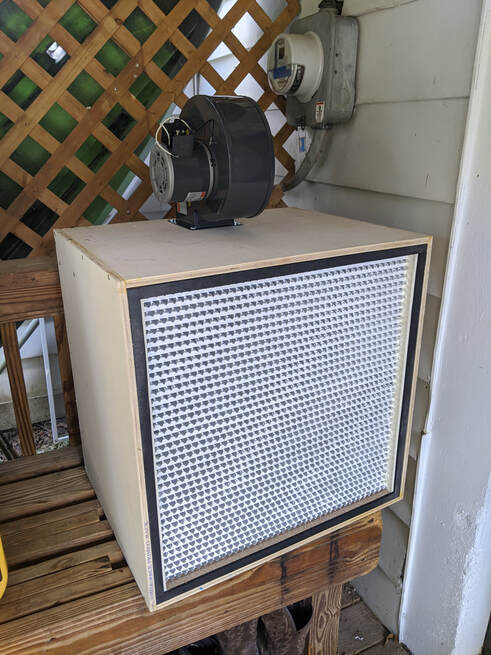 About halfway done by this point. The main box/plenum is complete, with the blower bolted in place. Notice that the blower is actually positioned 90 degrees from where the drawing side view indicated. The blower bolts to the top piece of plywood where I'd cut out a hole with a jigsaw (bought specifically for this project!). Unfortunately, after cutting the hole while smoothing the edges down with a rattail file - I accidentally hit the filter with the end of the file. I couldn't see the back of the filter very well so I figured I'd just bent some of the aluminum fins. Turns out these filters are quite fragile, more on that later. A couple other differences from the FreshCap guide:
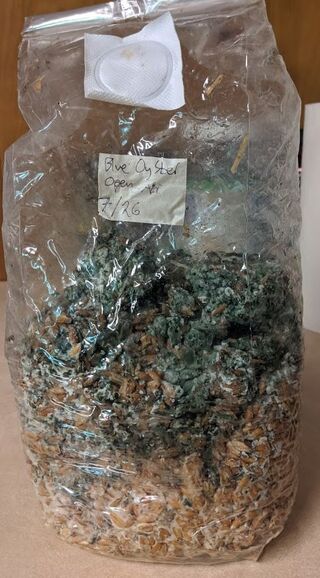
So, having assembled all five panels of the primary filter box, and cut the hole in the top for the blower, I had to get my hands and a wrench on the inside of the plenum to torque the mounting nuts. I did this by removing the rotor from the blower and reaching through the blower. It was rather awkward and took longer than it should have. Order of operations is important when assembling such a machine, so if I ever make another one putting the rear panel on after everything else is done would be more efficient. I used caulk to fill the gaps between the edges of the rear panel and the rest of the box's panels, to make an airtight seal. Wood glue doesn't fill gaps very well and would have made the rear panel nearly impossible to remove. Would also have allowed me to screw the prefilter plenum on from underneath which is easier and more structurally sound that the method I went with in this build.  Side view of the prefilter box is on the upper half of the drawing. Top view on lower. 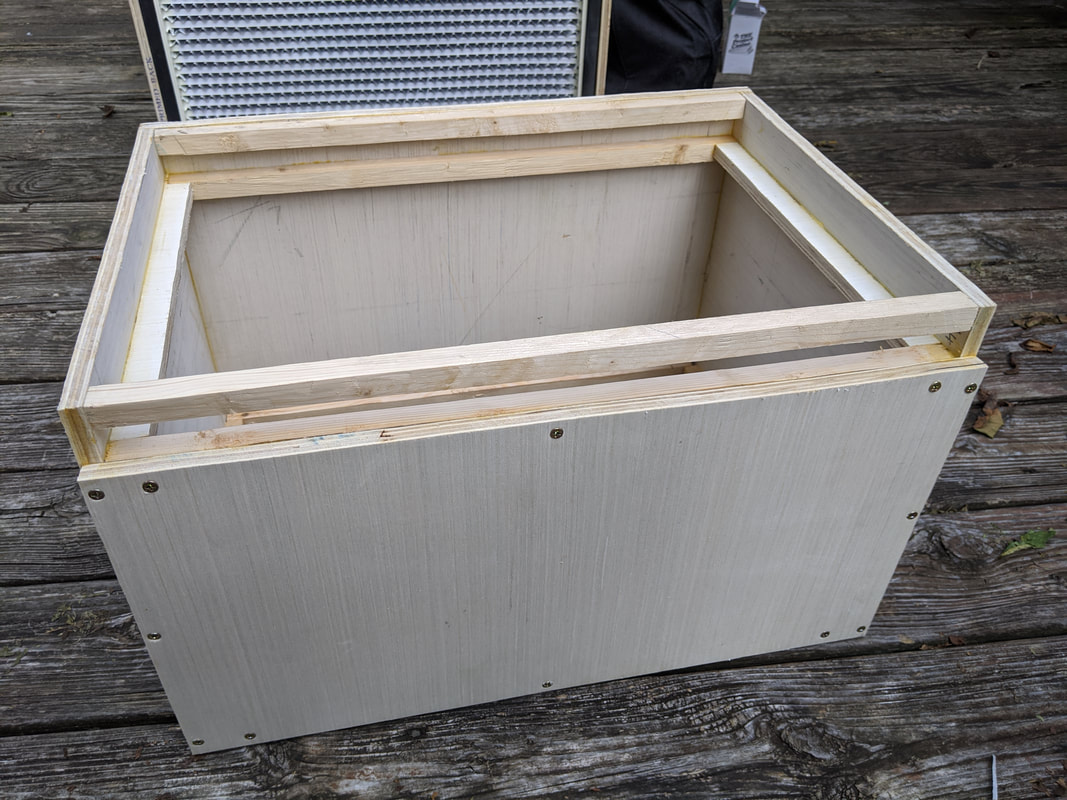 The prefilter plenum assembled, filter slot on top. The prefilter plenum is designed to accept a 20"x14"x1" HVAC filter. The dimensions were chosen based on the particular filter I was able to find at Lowe's. the 20"x14" was a good compromise between flow resistance (more area, lower pressure drop) and size - didn't want the prefilter box to be too huge, in order to save on weight and materials. The 20"x14" filter gives slightly more than 0.1" WC pressure drop at around 400 CFM, which is acceptable. It's constructed using the same techniques as the main filter box. I applied wood glue to the edges and used #8 wood screws with pre-drilled holes to clamp the wood together. The small square sections you can see forming the filter slot is actually reclaimed wood. I saved several slats from a box spring (for a bed) I'd busted up when moving out of my old place a few months ago. I ripped them in half with the jigsaw and then used a hand planer to shave the wavy cut down to a nice straight edge. More of the same battens were affixed to the bottom of the prefilter plenum. The idea is I would attach the plenum to the main filter box by screwing through the battens. That would provide enough clamping force to compress the weather stripping, forming an airtight seal. The alternative to this would have been screwing directly into the plywood edge of the prefilter plenum from below, but that would have required access to the inside of the primary filter box, which I didn't have as explained earlier. The benefit to having the screws accessible from above, however, is that it's easier to remove the prefilter plenum if maintenance needed to be done. 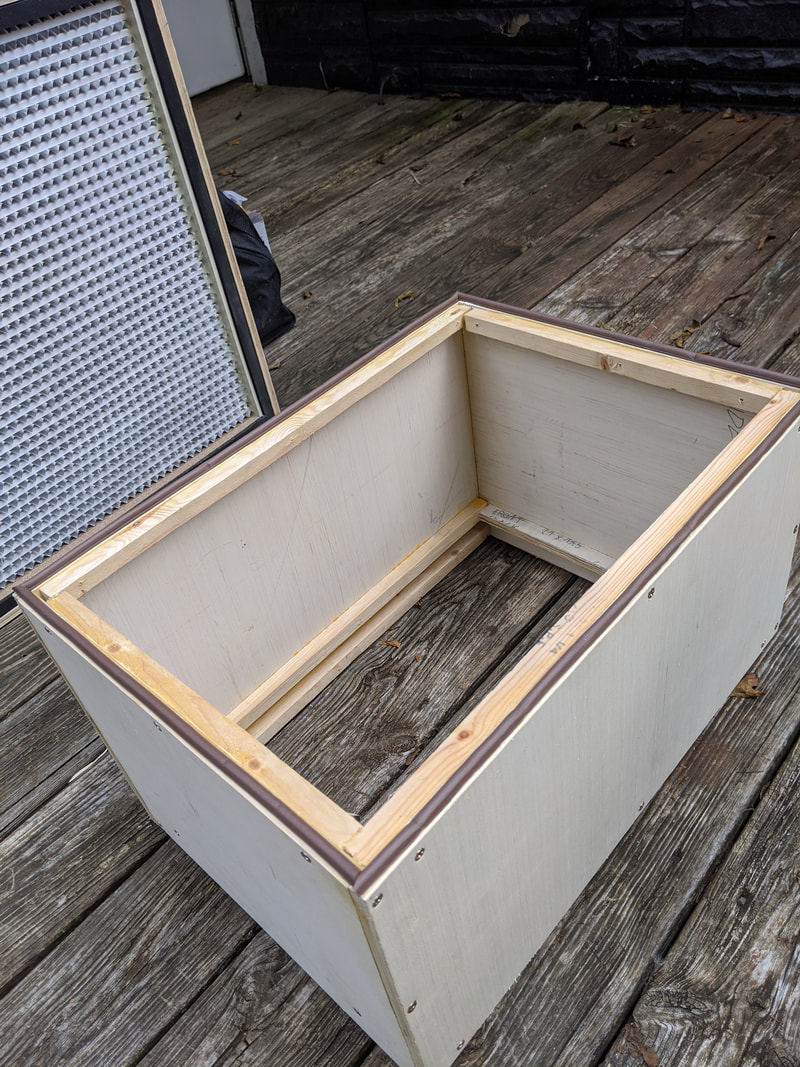 Underside of the prefilter plenum, where it would attach to the top panel of the primary filter box. The dark brown is some foam weather stripping to ensure an airtight seal. The completed flow hood! Well, almost completed... After the prefilter plenum was screwed down I wired the blower to the switch on the lefthand side of the prefilter. Was quite easy to do, drilled a 3/8" hole through the plywood for the wires and pushed some caulk in to deny its use for airflow. 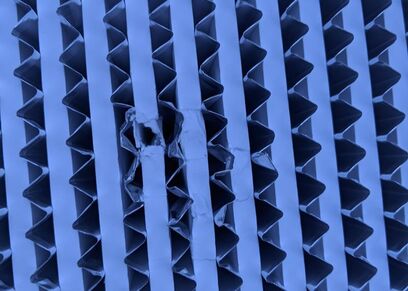 Damage done to the filter by the rat-tail file during assembly. It's a good thing I made the prefilter plenum easy to remove. After assembling all the wooden parts, wiring the blower and switch up, and testing it for the first time, I found out that when I'd earlier smoothed off the edges of the blower hole with a rat-tail file, I'd accidentally punctured the filter membrane of the HEPA. Oops! I had to take the prefilter plenum off to access the screws holding the back panel in. Then, because I'd already caulked the back panel, had to pry it out with a screwdriver. This was an annoying task and damaged the edges of the plywood slightly. After getting the main filter box open I was able to patch up the HEPA with some pieces of printer paper and caulk. After re-caulking the back panel and testing it again I seemed to have even airflow so I can only hope that the repairs are airtight. It's been a couple weeks now since I've built the laminar flow hood and it's working well. The blower draws about 100 Watts, so leaving it on for 10 hours straight to scrub the air of my lab only costs $0.10 in electricity - not bad. Have done 7 or 8 grain transfers infront of the hood and only had one contaminate so far. That's an improvement. My next step is to construct an attachment to the front of the flow hood - an open-ended box - to create a hard barrier between the clean sterile airflow and the rest of the lab in which I can perform sterile work with a high degree of confidence. I will also include a germicidal UV lamp in the attachment box's ceiling that will be turned on to thoroughly sterilize the front of the HEPA filter, the walls of the box, and tools that I leave inside the box. More on that in Part II. Thanks for reading! 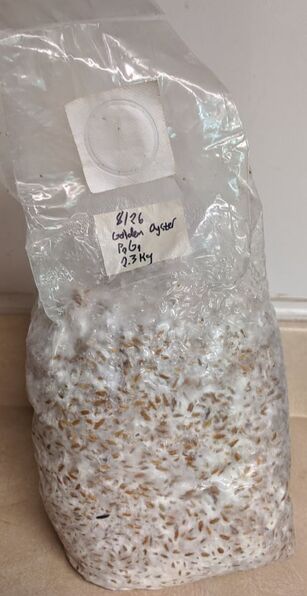 One of the spawn bags produced by grain-to-grain transfer in front of the new laminar flow hood. Happy and healthy! Recently relocated to a rental house in Blacksburg and so I wanted to make my first gardening project a raised bed as I haven't done this before. The primary challenge of raised bed or container gardening is importing large quantities of soil so I decided I'd use as much native material as possible. I knew I'd have to purchase commercial compost for quick and reliable results, bagged compost found at big box hardware stores would be quite expensive for this however, usually running upwards of $4 per cubic foot. Bulk compost is then the logical choice. A local landscaping company (dealers mostly in mulch, but also gravel, sand, and composted manure) seemed like a good choice. $40 per cubic yard (which is equivalent to $1.48/ft^3, close to 3 times cheaper than bagged compost). And being a very DIY type I also elected to transport the stuff myself in the back of my pickup truck (rather light duty model, a 2WD, 4 cylinder truck - nothing fancy). The 6 ft bed of the truck can comfortably accommodate 1.5 cubic yards of bulk material. I also could have chosen a 50/50 blend of compost and topsoil. However topsoil is significantly denser than compost - my little truck probably couldn't handle the amount I wanted to get. It struggled enough with 1.5 cubic yards of compost. And I wanted to utilize what this backyard already has plenty of - topsoil - instead of trucking it in. The organic matter in the compost is what's truly lacking and necessitated importation. The strategy of how to build the bed was fairly simple - I would sift the topsoil already there and combine it roughly 50/50 (by volume) with the compost along with some soil amendments, piling it in a wooden frame. This would be the raised bed. I picked a spot and did my best to arrange it so the long axis of the bed (about 4 ft by 8 ft) was parallel to the contour of the ground, the backyard being on a fairly steep hill. I then dug down about 8 inches using a pick and spade, shoveling the mix of rocks, tufts of sod and topsoil into a simple screen I'd made of 1/2" hardware cloth. I simply shook the screen over a wheelbarrow to screen out the rocks, sod, and larger clumps of clay. This was fairly grueling work, by the way - very difficult on the back and core to shake a 2'x3' screen with 50+ lbs of soil on it. A more advanced solution must be engineered, more on that in a future post. The resulting aggregate I put back into the dig site, doing my best to level the grade out in the process (so in other words I'm moving some material from higher up the slope to lower to create in essence a small terrace). And since I'm removing a significant amount of material (the finer, loose material of the topsoil) the resultant was lower than I'd have liked so I made up the difference by piling wood chip mulch over it. This also has the benefit that it will slowly decay and add a solid base of organic matter to the bed - the wood as it decays acts like a sponge, both for water and useful plant nutrients. The method of building garden beds known as "Hugelkultur" is similar, in which woody biomass is buried and acts as a reservoir for both water and nutrients whilst improving soil biology as it decays. 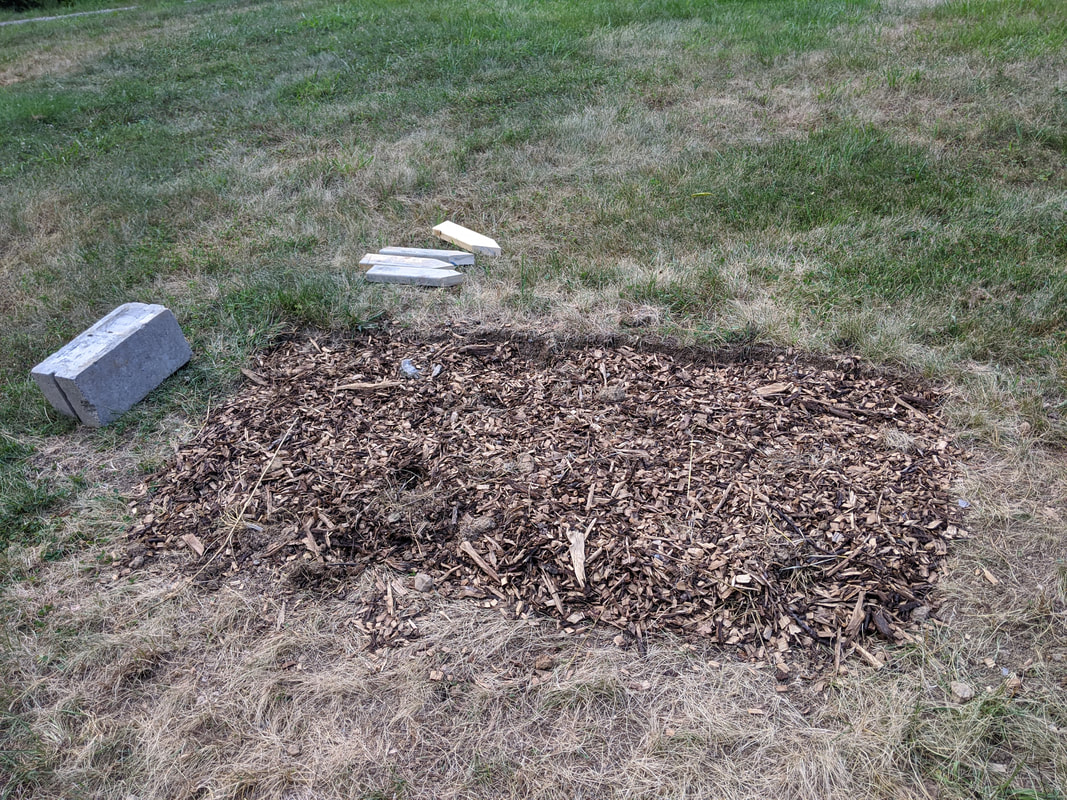 Here's the bed excavated and mulched. The soil was sifted and the resulting fines were piled into a 55gal barrel for temporary storage. After the bed was excavated, soil sifted, and mulch applied I built the frame. All from reclaimed lumber, either from a pile of demolition debris in the back corner of the house's lot or material scavenged from a local construction site. Most of the 2x4s were actually used as forms for pouring concrete pads, for placing heat pumps on. Most of the wood is untreated lumber so I expect the wood to rot within a year, but that's okay as I'm renting and probably won't be here longer than that. Ambitious gardening projects may seem contradictory for such a short-term rental situation, but I value the educational impact of this work highly. It will benefit me when I'm in a longer term situation as I will have more experience. The boards are simply screwed or nailed to short sections of 2x4s which were driven into the ground. Building the frame took much longer than anticipated, which is why I ended up working until almost 10 PM as you'll see from the fading light in the photographs. Wanted to get this project done that day as I had travel plans the next morning. 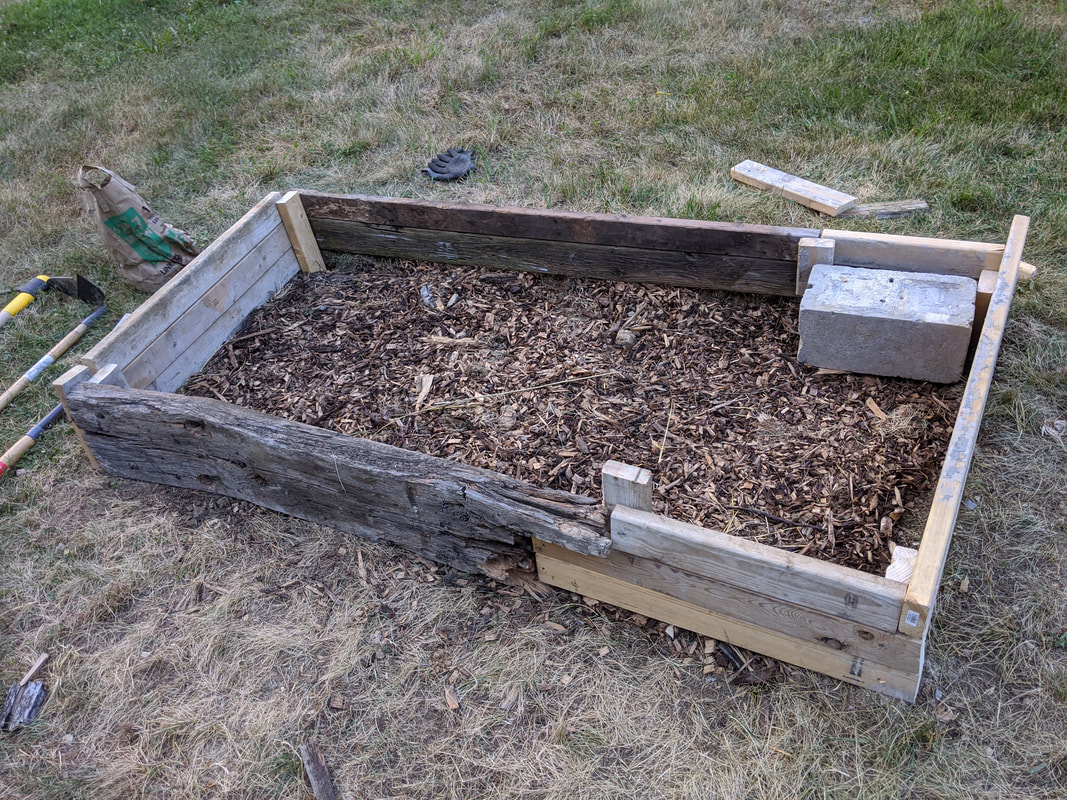 The frame for the raised bed, made of reclaimed wood. Next up came filling the frame. It turns out I also had to sift the compost as it hadn't been screened by the supplier, and had lots of chunks of clay and a few rocks in it. This added some delay but I feel it was worth it. Alternated dumping wheelbarrow loads of screened topsoil with screened compost, going for a 50/50 volume ratio. Obviously not measured very precisely but it doesn't need to be. I also had a paper grocery bag full of wood ashes (kindly provided by my Father) as a soil amendment. This is useful as it adds potash, a crucial nutrient for plants, and also raises pH. Soils in this area (southwestern Virginia) are known to be fairly acidic. I mixed the materials together by raking it around with a hoe between dumpings. 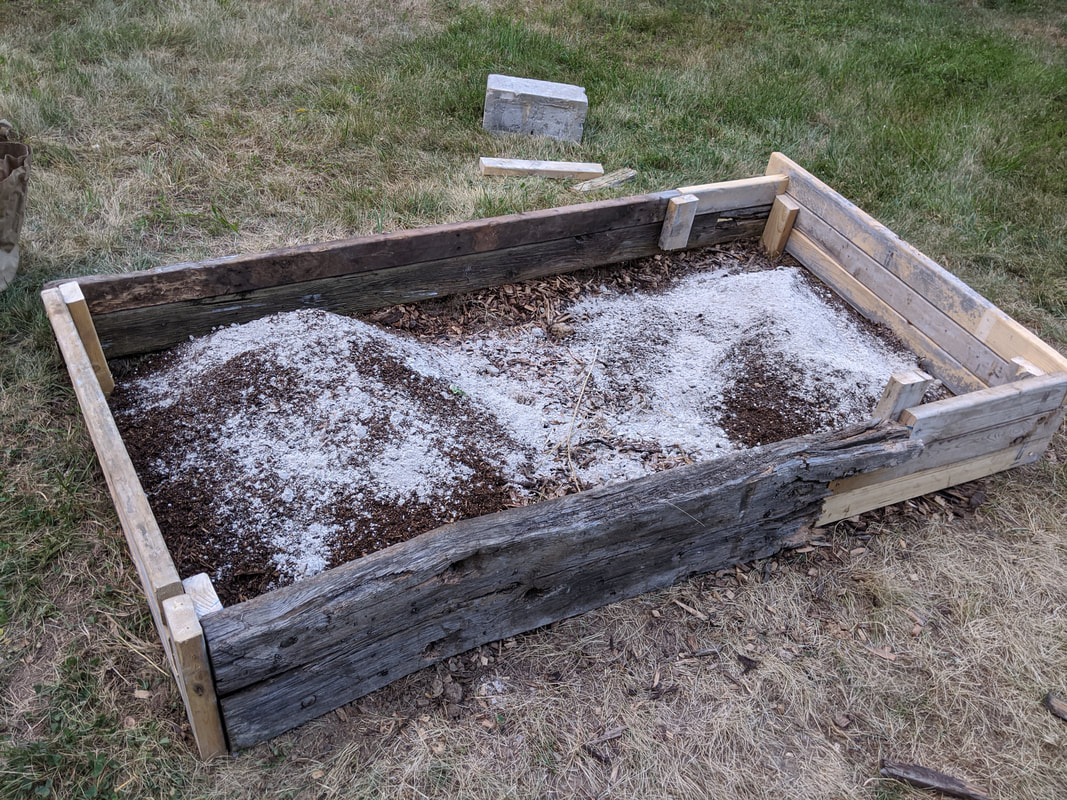 Raised bed partially filled. The white substance is wood ash. 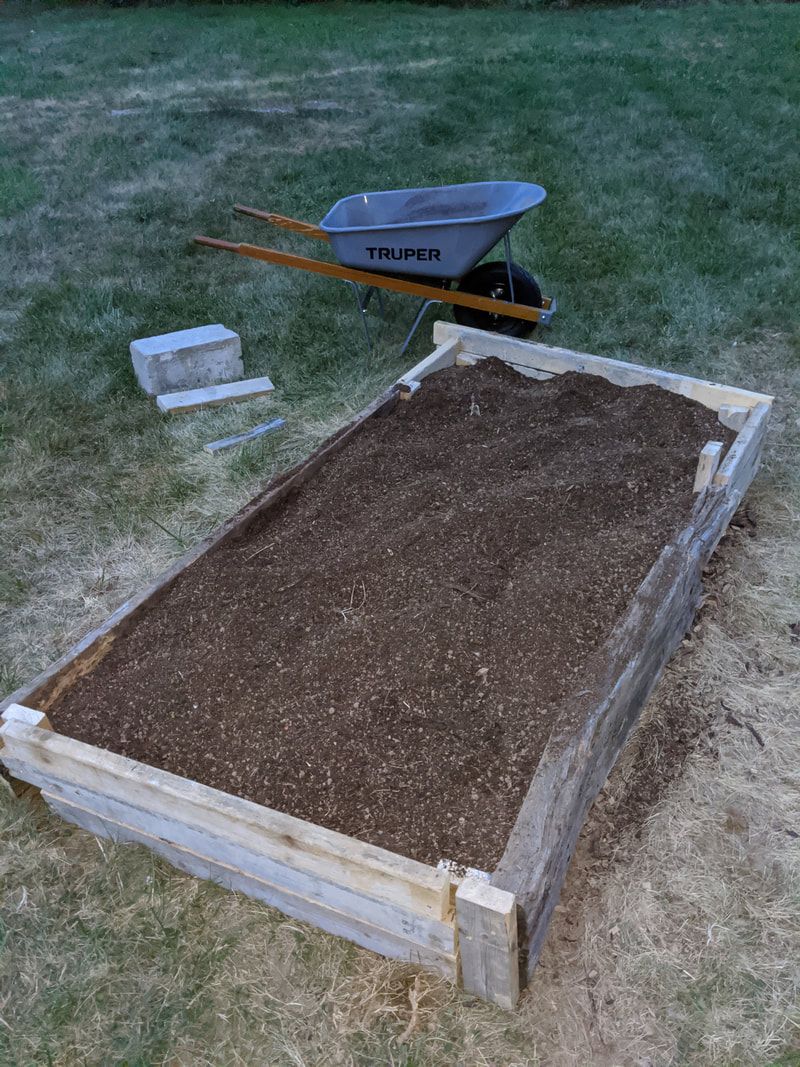 The raised bed is fully filled with mixed soil at this point. Wheelbarrow used for the operation is displayed in background. The next step was putting in my plants! I had many to choose from, all started from seed at my last house. They'd been somewhat neglected (should have been transplanted earlier), hence my sense of urgency in getting this bed built. Had three tomatoes, some rather small peppers several bean plants, and an eggplant. Some of them are so tiny you really can't see them in the photo. The consistency of the soil is quite pleasing, being very loose as one would expect as it is highly engineered. A far cry from the poor, rocky, compacted, mostly clay topsoil present in this yard. For each plant, I grabbed a handful of Black Kow brand manure compost and threw it into the hole each plant was to go into. This is the premium bagged stuff, at over $6/ft^3! Felt like one bag of the stuff would be worth it to try and give these plants the best conditions possible - it's clearly richer and better composted than the bulk stuff that makes up most of the raised bed. In fact I rather suspect that the bulk compost I bought was somewhat undercooked - when I unloaded it I noticed it was still quite hot inside the pile, consistent with an active composting process underway. And I could pick out pieces of un-composted material - horse dropping by the look of it. 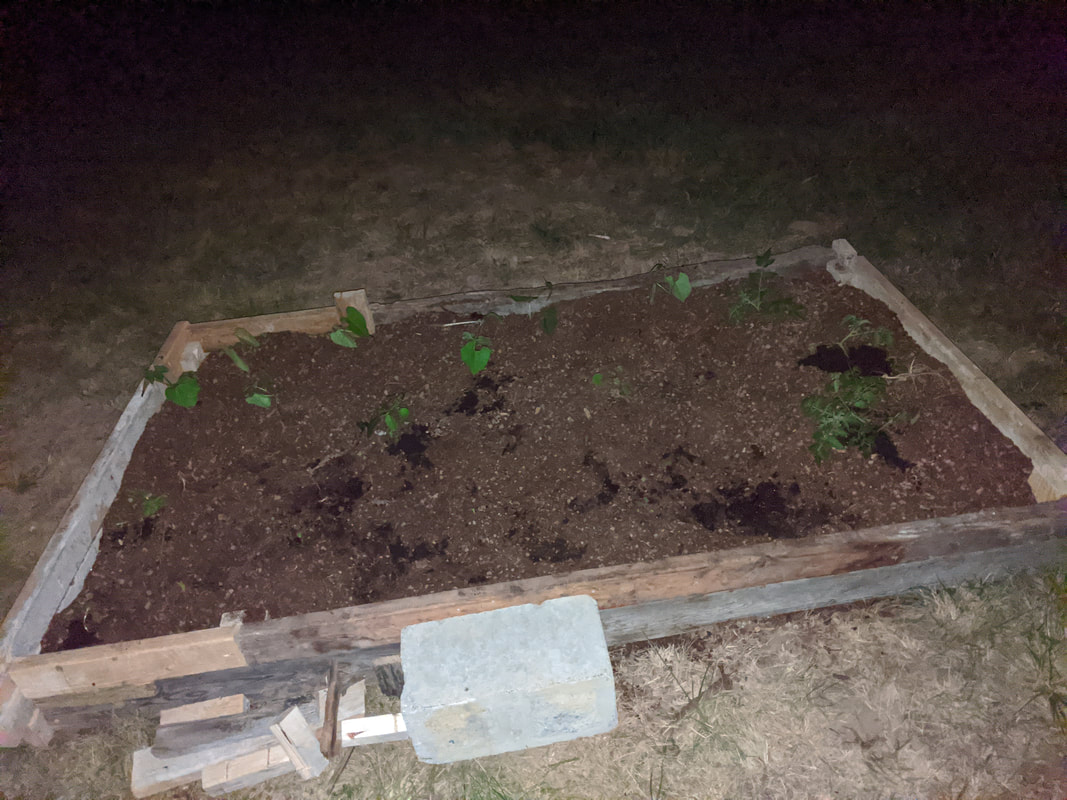 Several plants transplanted into the newly constructed bed. The last step was to put up deer netting, a vitally important step in this particular area. Otherwise I'd expect the total destruction of all of the plants within a matter of days! Rats with hooves, as an uncle of mine likes to say. I also mulched the bed with damp straw, which was actually the spent substrate used to grow Oyster mushrooms on (more on that in a later post). Only had about 4 gallons worth of it, as you can see I didn't quite have enough to cover the entire bed. Will make for something of an experiment, to compare the growth between plants that got a straw mulching to those that didn't. 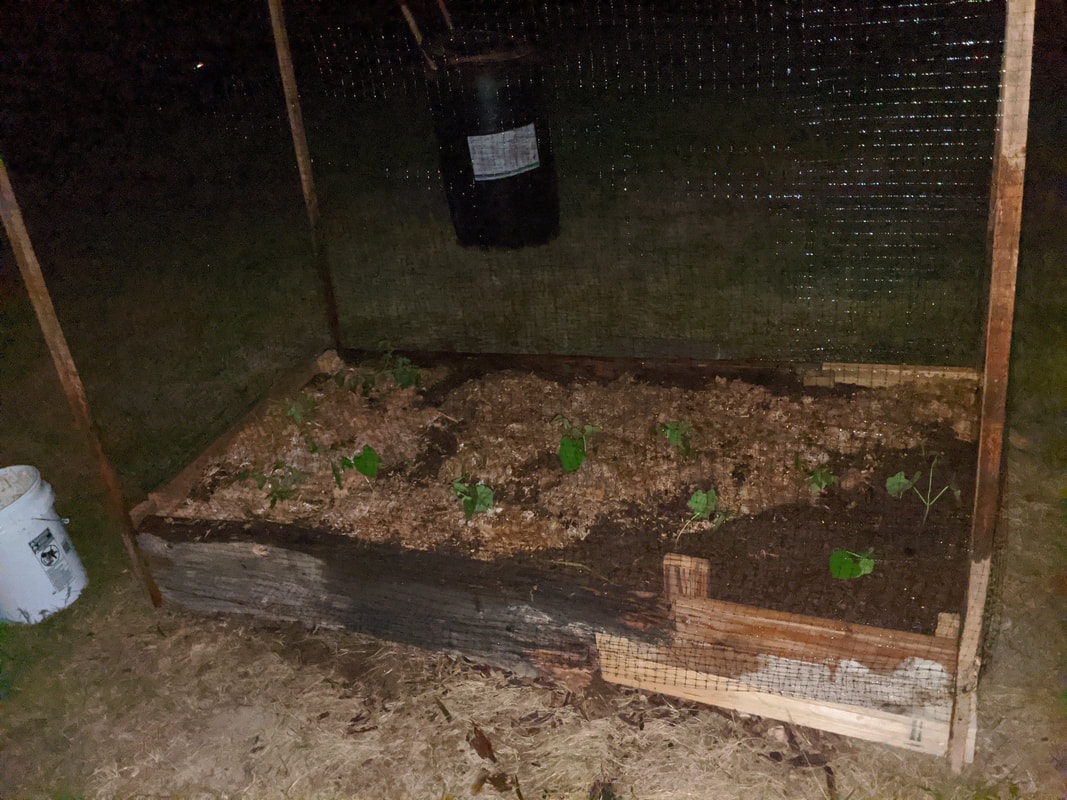 The finished product. 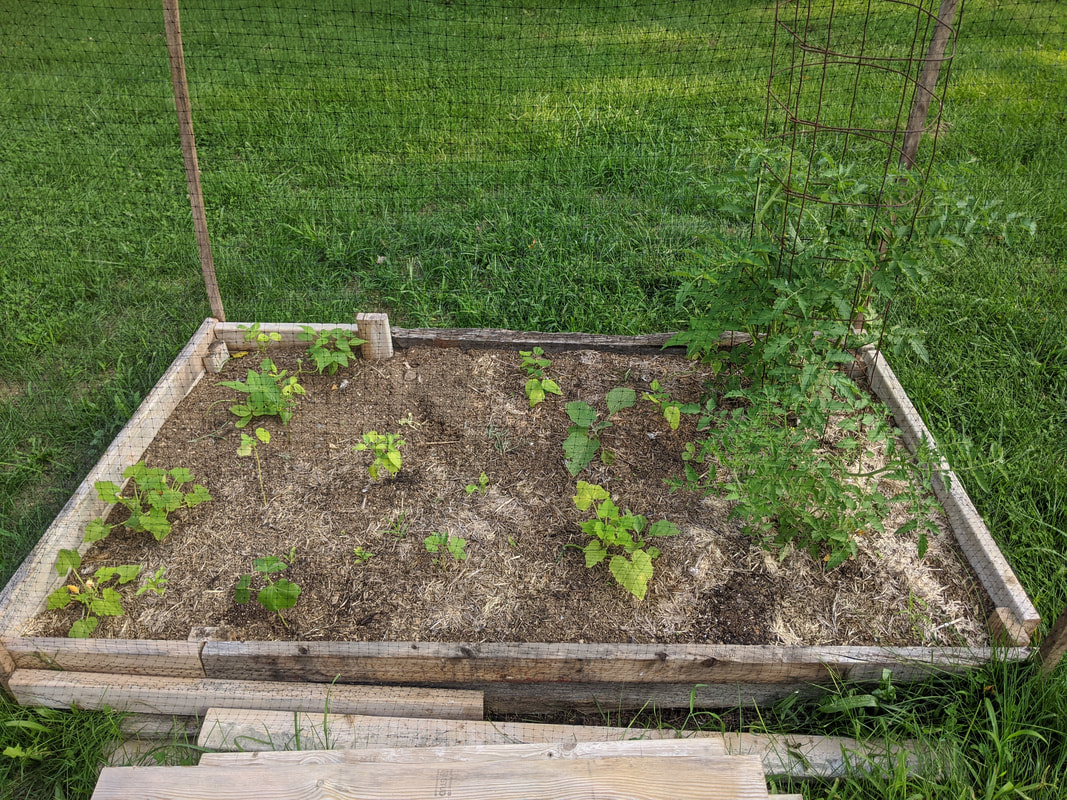 The raised bed, 6 weeks later. And above you will find a photo of the bed 6 weeks on! Not all skittles and beer, however. Most everything but the tomatoes seem to have done rather poorly - not much growth and yellowed leaves. One of the bean plants actually died, and I've since installed some additional plants, such as another Okra and some cucumbers (bottom left).
I was at a loss for a while - a farmer friend of mine suggested applying a liquid fertilizer with micronutrients, which I did - I tried some ferti-loam brand chelated liquid iron (contains other micronutrients as well). Clearly there is some sort of nutrient uptake issue. I did do a crude soil pH test and it indicated rather high - above 8. So I may top dress with some sulfur to lower the pH and see what happens. Interesting that the tomatoes seem to be doing quite well, however. Additionally there are two eggplants that were practically microscopic when first transplanted that now seem to be doing fairly well. Another theory is that a poorly developed microbial/mycorrhizal community in the soil is adversely effecting the plants nutrient uptake capabilities. I may try to remedy this with a compost tea application. |
Eli MeyerEngineer and extreme DIY enthusiast. ArchivesCategories |
 RSS Feed
